Friday, 1 March 2019

How to Send a Song from iTunes to iDevices with iTunes


1. How to Send a Song from iTunes to iDevices with iTunes

You can send any type of media from iTunes to any iDevice using iTunes. Blow is the guide to send a song from iTunes to iDevices.

Step 1: Open iTunes on your pc/Mac.

Step 2: Now connect your iDevice to pc/Mac using the USB cable.

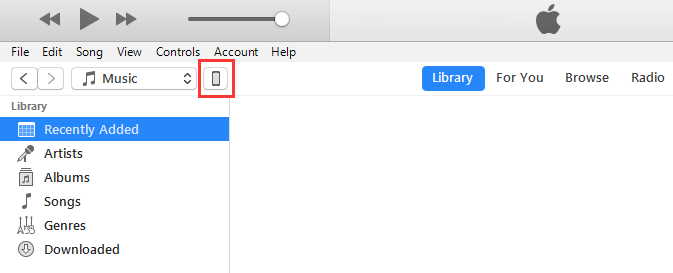
Step 3: When iTunes recognize your device, click on your devices icon.


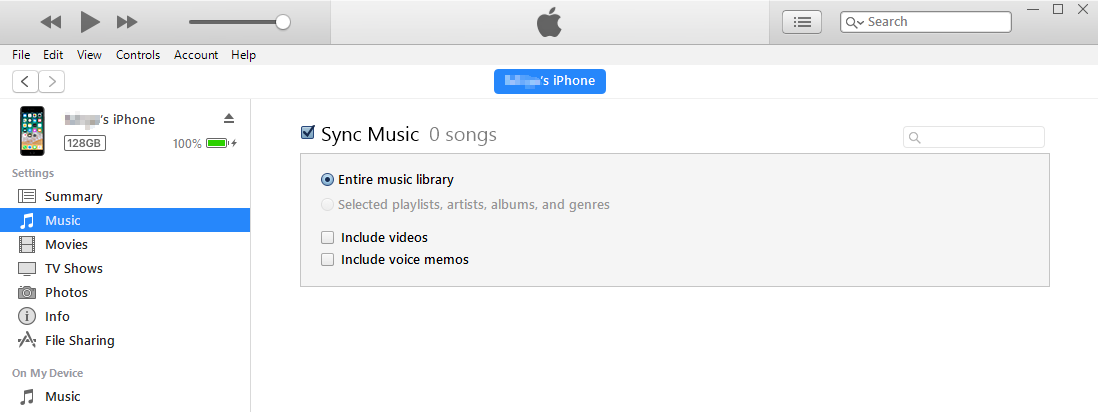
Step 4: On the left sidebar, choose "Music". Check “Sync Music” and then tap "Apply" to sync the songs to your iDevice. Just wait till it finish. If you prefer to select only certain songs from your iTunes library, then you'll need to click the radio button next to "Selected playlists, artists, albums, and genres."


How to Send A Song from iTunes to Computer

Among its functions, Apple’s iTunes program serves as a database for sorting and organizing your digital media collection. However, the files that make up that media collection primarily live in a folder called iTunes Media (or iTunes Music) on the computer. To move the songs to computer, you just need to find and move the folder to where you want it.

Step 1: Open the iTunes software, now go and tap on “Edit” and then choose "Preferences".


Step 2: On the pop up window, click "Advance" on the top. The you can see "iTunes media folder location". Normally, it is in this folder "C:\Users\Your Name\Music\iTunes\iTunes Media".


Step 3: Just follow it to find the iTunes media folder. In the folder, you can see another music folder which contain all your iTunes songs. Just copy them to where you can easily find it on your computer.
Also Read:5 Best Funny Face Swap Apps For iPhone in 2019
Also Read:How to Share Private Home Videos with Family and Friends?

How to Unjailbreak An iPhone


If you’ve decided to unjailbreak your jailbroken iPhone in order to restore your iPhone, iPad or iPod touch to its original operating system (iOS), then you can achieve this by either using the backup/restore feature in iTunes or using Cydia Impactor. However, the need to totally erase your iPhone will come up after unjailbreaking your iPhone. What do you do to totally wipe out all your data and information to make your iPhone become new?

Therefore, we shall be introducing you to the two ways to unjailbreak iPhone, and the best way to permanently wipe out iOS data from a newly unjailbreaked iPhone.


Part 1: How to Unjailbreak An iPhone


Part 2: How to Completely Erase An Unjailbroken iPhone


Part 3: What You Need to Do before Unjailbreaking iPhone
How to Unjailbreak An iPhone

The following methods will work perfectly in unjailbreaking your jailbroken iPhone.
#1. Using Cydia Impactor to Unjailbreak iPhone

With little effort, you can unjailbreak iPhone using Cydia Impactor. However, this tool works for iOS 8 iPhone, iPad, and iPod touch. Be sure to safely backup your iOS device as this method will erase all your contents, settings, and apps.

Step 1: Make a backup of your iOS device contents and settings using iTunes or iCloud.

Step 2: Make sure that you have at least 20% of battery life on your iPhone, iPad, or iPod touch.

Step 3: Download and install Cydia Impactor from Cydia.

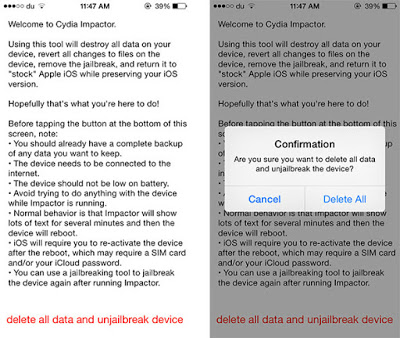
Step 4: Run Cydia Impactor by clicking “Delete all data and unjailbreak device”. Then click “Delete All” tab to confirm your action. The process will be shortly after this when it’s complete, you’ll see your iOS setup screen.


Step 5: Go through the iOS install and activation process.
#2. Use iTunes Restore Feature

Another method to unjailbreak iPhone is by iTunes Restore feature. However, this process requires you to back up your iPhone, iPad or iPod touch before unjailbreaking it.

Here are the steps to follow:

Step 1: Launch iTunes on your computer.

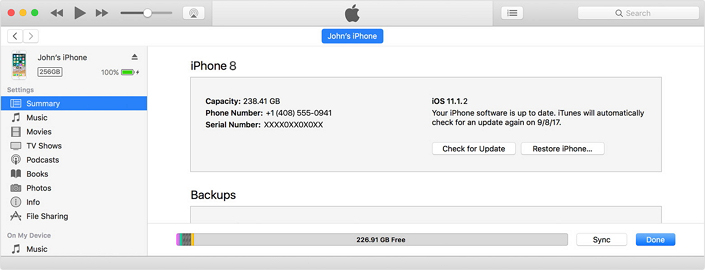
Step 2: In the Summary tab, Click “Restore iPhone”.

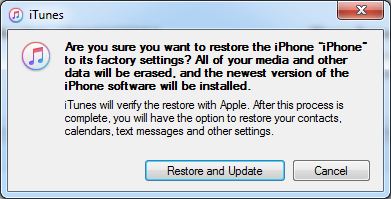
Step 3: Then click “Restore and Update”. The restore process may take several minutes to complete, you should not unplug your iPhone during the restore process.


Step 4: Your iPhone will restart with the latest iOS after these steps, and all of your data and settings, including jailbreak features will be erased.
How to Completely Erase An Unjailbroken iPhone
Also Read:How to Access and Unlock Android Phone with Broken Screen


Also Read:Top 7 Best Websites to Convert AVI to MP4 Free Online 2019

Thursday, 28 February 2019

Spinning Wheel Next to WiFi Won’t Stop on iPhone? 6 Tips Offered


Question

Hello! I'm wondering what is the spinning circle/rotating circle on my iPhone showing just next to the Wi-Fi icon. It is kind of loading icon. It is really annoying. What should I do? How can I stop this? Please help!

Like the above user, you might also be facing this problem and that is why you are here. This loading icon or rotating wheel can indicate that your device is going though internet data exchange with Apple servers. If the circle seems unceasing, we are going to explain you the ways through which you can get rid of this continuous spinning wheel. Check out the tips you need to try when iPhone spinning wheel won't stop.
6 Tips to Fix iPhone Spinning Wheel Won't Stop


1. Disable Background App Refresh


2. Force Quit All the Apps


3. Update to the Latest iOS


4. Stop Automatic Downloads and Updates of the Apps


5. Cut Internet Connection


6. Fix iPhone Spinning Wheel Won't Stop without Data Loss
1. Disable Background App Refresh

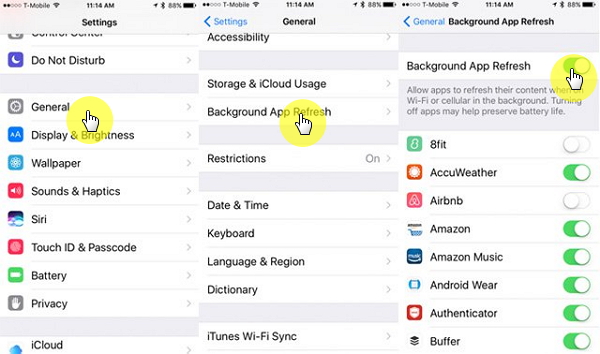
The spinning wheel issue most of the times means that some operations are running in the background. When Background App Refresh feature is enabled, there are certain app operations which you may have closed but are still running in the background. Such acts consume a lot of processing memory space in the device and therefore, turning off the Background App Refresh feature will help you when iPhone spinning wheel won't stop. To do this, just head to 'Settings' > 'General' > 'Background App Refresh' and toggle the switch to disable it.


2. Force Quit All the Apps

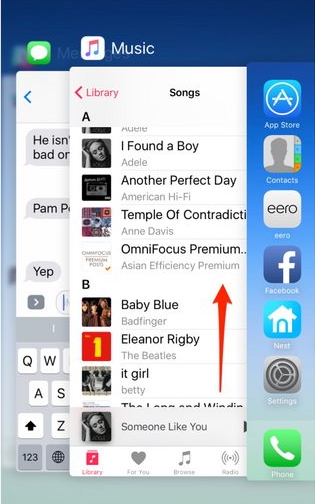
When the problem continues to appear and the spinning wheel next to Wi-Fi in iPhone didn't vanish following the above steps, try to force quit the apps you have used and those are running in the background. Tap on your 'Home' button twice and you will get to the screen having all the apps running. Start swiping up the app one by one and close all of them. If you're an iPhone X user, swipe up from your Home screen a little and pause at the middle. Touch the app for 1 sec and you will see a red circle on each app. Now swipe up the apps and close all.


3. Update to the Latest iOS

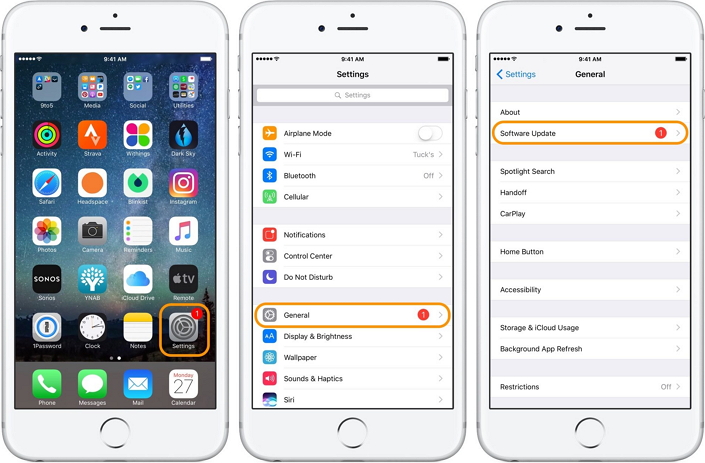
The spinning wheel next to Wi-Fi can also occur due to an old iOS in your iPhone. Hence, it is recommended to update your device into the latest iOS version. Go to 'Settings' > 'General' > 'Software Update'. Your device will show you the available updates. Download the new version by following the instructions and update your device.
Also Read:5 Best Funny Face Swap Apps For iPhone in 2019Also Read:How to Share Private Home Videos with Family and Friends?


4. Stop Automatic Downloads and Updates of the Apps

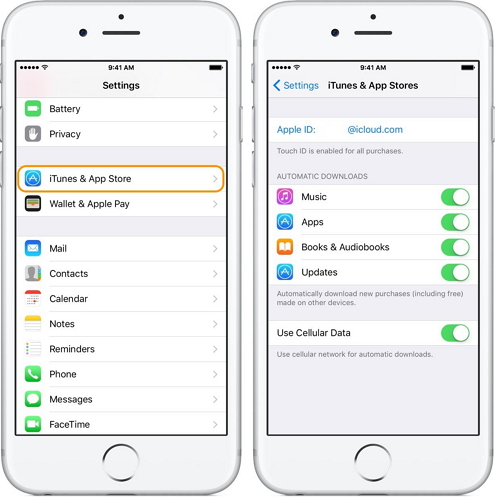
Many times, automatic downloads and updates tend to work in the background of your iPhone. So, you're more likely to see spinning wheel next to Wi-Fi if any of your updates or downloads are in progress. Moreover, you may continue to see the spinning wheel next to Wi-Fi till the time the download or update is completed. Sometimes, packages are too huge in size and may take long hours to get the process completed. To avoid this situation in future, try turning off the 'automatic downloads and updates of the apps'. Here's how to do it: head to Settings > iTunes & App Stores > Now, toggle off all the available options under 'Automatic Downloads' section.


5. Cut Internet Connection

When you still get that rotating circle on your iPhone, cutting internet connection could give you assistance. Make sure to turn off your Wi-Fi and discontinue the internet connection. After switching off Wi-Fi, check if that spinning wheel goes away or not.
Also Read:Windows Media Player Won’t Play AVI Troubleshooting
Also Read:Top 10 Best Football Live Streaming Sites for You to Watch Soccer Live on TV 2019
Also Read:10 Best Party Planner Apps for your iPhone and iPad in 2019
Also Read:Best Inventory Management Apps for iPhone and iPad in 2019Also Read:How to Permanently Delete Photos and Videos from Samsung Mobile Phone


6. Fix iPhone Spinning Wheel Won't Stop without Data Loss

Well! We offered many useful solutions to resolve the spinning issue. Sponsor ads:

Gihosoft Free iPhone Data Recovery:https://www.gihosoft.com/iphone-data-recovery-free.html

Gihosoft iPhone Data Recovery Free

Free iPhone Data Recovery Software for Windows/Mac

Recover up to 12+ types of files, including contacts, SMS, photos, WhatsApp, Viber, notes, etc.

Restore lost data from iOS devices directly or from iTunes and iCloud backup

Recover iPhone data lost due to iOS upgrade/jailbreak, accidental deletion, device lost or broken

Support all the latest iPhone, iPad and iPod Touch

Both Free and Pro version.

If you lost data after you updated to a new iPhone, you can always use Gihosoft iPhone Data Recovery to get the data back from the old iPhone or backup.You may also like: iphonerecovery.com

If you use android phones, please choose Gihosoft Android Data Recovery.

With Gihosoft Android Data Recovery, no longer afraid of data loss!

Must read:Youtube video downloader for pc

Gihosoft RePicvid Free Photo Recovery Software provides a free photo recovery software for windows to help users recover the deleted or lost photo for free.

Jihosoft Android Data Recovery: the best Android Data Recovery software for Windows and Mac to recover deleted contacts, messages, photos, videos, WhatsApp and etc from Android devices.Tips:How to transfer messages from iPhone to iPhone

jihosoft Free iPhone Data Recovery

Tuesday, 26 February 2019

How do I Know If My iPhone is Locked or Unlocked 2019


How do I Know If My iPhone is Locked or Unlocked
#1. Check If Your iPhone is Unlocked via Settings

This method is one of the oldest methods of checking if an iPhone is unlocked, but it’s still very efficient with every version of iOS. Here are the steps to take.

Step 1: Launch your iPhone Settings.

Step 2: Click Cellular.

Step 3: Find the option labelled “Cellular Data Network”. If you can find this option, then your iPhone is unlocked, but if not, your iPhone is carrier-locked.


#2. Check If Your iPhone is Unlocked Using a Different Carrier’s SIM Card

I presume you know what a carrier SIM Card is? Then, this method is to replace the iPhone’s original carrier SIM Card with another mobile operator’s SIM Card. If a notification with the caption “SIM Not Supported” or some other request is made from the phone app such as “Activation Code” or “SIM Unlock Code” is displayed, then your iPhone is carrier-locked.

Here are the steps to check if your iPhone is unlocked:

Step 1: Switch off your iPhone using the power button.

Step 2: Locate and open your SIM card slot using your SIM eject tool or a small paper clip. You will find the SIM slot by the iPhone casing, and you can open the SIM slot by pushing the SIM eject tool into the small SIM tray Hole.

Step 3: Diligently pull the SIM tray out once it pops out, and replace the SIM card with another mobile operator’s SIM card.


Step 4: Insert the tray back, and switch on your iPhone. If your iPhone request for a passcode, enter your passcode or use the touch sensor to pass.

Step 5: Click on your iPhone app. If it’s requesting for a “SIM Unlock Code” or an “Activation Code” or you experience error before opening the app, then your iPhone is carrier-locked.

You can also refer to this video for further details:
#3. Check If Your iPhone is Unlocked Use An Online Service

This method is long and it entails using your IMEI info registration page to check if an iPhone is unlocked.

These steps will help you through it:

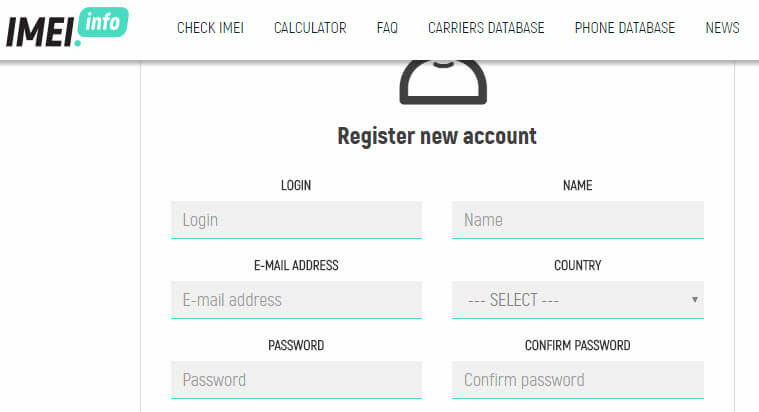
Step 1: Open IMEI Info’s registration page, and create an account.Sponsor ads:Help You Download Private Facebook Videos
Sponsor ads:How to Remove RAR Password Online in Windows without Software 2019


Step 2: Enter the required information in the specified fields and click “Register Me!”

Step 3: Confirm your registration by clicking on the link sent to your provided email address. This would take you to the IMEI Info’s main page where you will enter your iPhone’s IMEI number.


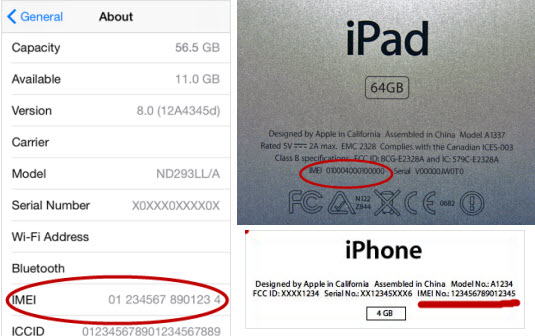
Step 4: To find your iPhone’s IMEI number open iPhone Settings and click General > About, and scroll down to IMEI section – you’ll find the number there.

Step 5: Input the IMEI number in the field provided on the IMEI info’s main page.

Step 6: Click “I’m not a robot” > Check > SIMLOCK & WARRANTY > Check Apple Phone Details. You’ll see: unlocked: false or unlocked: true. The first means that your iPhone is carrier locked, while the second means that your iPhone is unlocked.
Sponsor ads:Hack Someone’s Cell Phone With Just Their Number
Sponsor ads:Fix Windows 10/8 100% Disk Usage with 5 Methods 2019

How to hide apps on your Samsung, OnePlus, Xiaomi, Huawei and Honor Android device 2019

How to hide apps on your Samsung, OnePlus, Xiaomi, Huawei and Honor Android device 2019


Hiding apps is sometimes a desperate need of the time!

Whatever be the reason, there could be some apps that you want to hide from the prying eyes. Whether that be your investment apps, finance apps including that of your bank, social networking apps, and those you-know-which apps, it’s good to know how to hide apps on your Android smartphone.

Android OS by default doesn’t provide an option to hide apps. Which is why you don’t see the ‘hide apps’ feature on stock devices like Google Pixel.

But OEMs like OnePlus, Samsung, Huawei, Honor, Xiaomi and others provide the option in their home screen app itself. You can simply use that to hide apps right away on your Android phone — thus, no need to install any 3rd party app for this for the above brands.

But if your device doesn’t have the option in the default homescreen app on your device (whichever OEM it is), you can use any of the suggested apps from the Play Store for this purpose as given in the article link right below.

For those who own an Android device from Huawei, Honor, OnePlus, Samsung or Xiaomi, we have got you covered with OEM-specific guides below. Check them out!

Here’s a step-by-step guide for each of the above OEMs to hide apps on your phone. You won’t need any 3rd-party Android app for this as the feature is already provided by the respective OEM within the stock launcher app.

⇒ Make sure you are using default launcher that was running on your Android device. If you are using a custom launcher, the settings may be different or may not be available.
Hide apps on Samsung devices


Go to any of your homescreen with some empty space.


Long press on the empty space to bring up a menu at the bottom.


Tap home settings.


Tap on hide apps.


Select the apps you want to hide.


Tap on Apply.


Tap on Home button to go back to homescreen.Sponsor ads:Best Torrent Search Engine Sites to Find Your Favorite Torrents

How to access hidden apps on Samsung Galaxy devices


To access hidden apps, swipe up on the homescreen to bring up apps screen, and type the app’s name in the search bar.

How to unhide apps on Samsung Galaxy devices

See the guide above to hide the apps. In step 5 above, unselect the apps you no longer want to hide to unhide them.Sponsor ads:iPhone/iPad Keeps Restarting? Here’s the Fix!
Sponsor ads:Set Spam Filter on iPhone to Stop Junk Mails and Texts
Hide apps on Xiaomi devices

Go to Settings, and click on App Lock.

You will be presented with the option to hide the desired apps by clicking the toggle.


When you hide an app, it is moved to a hidden folder. Its Home screen shortcut is hidden as well. The feature isn’t supported for system apps.


To access hidden apps, go to homescreen and then perform a pinch-out gesture (that is, spread two fingers).


You’ll see a message asking you to enter your App lock password.


After you enter the password, the folder with hidden apps will appear.


Tap on the app to open it.
Hide apps from Huawei and Honor devices


Go to the homescreen of your Huawei/Honor device.


Do a pinch-out gesture — that is, swipe apart with two fingers on the screen.


Now tap on the option Add.


Select the apps you want to hide from the apps screen.

How to access hidden apps on Huawei and Honor devices


To access hidden apps, simply do a pinch-out gesture on the homescreen again.


Touch the app to open it.

How to unhide apps on Huawei and Honor devices


Open the Hidden apps menu by doing a pinch-out gesture on the homescreen.


Tap on Add.


Unselect the app(s) you want to unhide.


Tap on OK.
Hide apps on OnePlus devices


You may need to update your OnePlus Launcher app for the feature. Search for the OnePlus Launcher app in the Google Play Store and tap on Update if an update is available.


Open the app drawer.


Swipe to the right from the left edge of the device.


You’ll see a new Hidden Space option.


Tap on Edit icon.


Select the apps you want to hide on your OnePlus device.


Go back. You will see the apps you chose to hide the Hidden space screen.

How to unhide apps on OnePlus devices


Go to Hidden space section as described above.


To unhide an app, simply long-press on its icon.

To unhide an app, long-press the specific app and choose Unhide. Alternatively, you can tap on edit and uncheck the apps to unhide them in one go.

Must Check Out Posts:

10 Solutions to Fix Windows 10 Does Not Recognize Android

How to Schedule Text Messages on Android

How to Schedule WhatsApp Messages on Android and iPhone

Best 11 Free Android Email Apps You Should Try Out 2019

Top Best Offline Music Downloader Apps for Android

The Best Snapchat Like Face Filter Apps


Jihosoft Photo Eraser

Erase unwanted objects and perfect your amazing photos!

Remove objects from photos with Photo Eraser is almost as easy as taking a shot. Now you can use this tool to erase undesirable objects from your pictures, such as tourists, watermarks, logos, texts, blemishes and other unwanted things without real photo-editing skills required at all.


Jihosoft Android Data Recovery

The most powerful and professional data recovery software for Android that can restore deleted or lost contacts, photos, videos, audios, SMS, call logs, WhatsApp chat, Viber messages from any Android devices due to accidental deletion, virus attack, formatting. It supports all popular Android smartphones and tablets like Samsung, HTC, LG, Huawei, Motorola, Nexus, etc. In the meantime, you will be guided step by step if you never used this kind of tool before.

How to Make a Podcast on iPhone 2019


With today's technology, almost anyone can make a podcast. With a little bit of patience and effort, your own podcast can be up and running in no time. Here, you’ll learn how to make podcasts on iPhone.
Before Making a Podcast on iPhone

Picking a topic for your podcast should not be a difficult task. There are many different topics for podcasts including comedy, crime investigations, beauty, entertainment, technology, and more. Pick what interests you and make sure you enjoy discussing it. Making a podcast should be something that is fun, not a chore. Don't be worried about people not being interested in your podcast. Chances are, if you're interested in your topic, there is probably a lot more people that are interested as well.
Popular Apps for Making a Podcast on iPhone
1 How to Make a Podcast on iPhone with Opinion

Opinion allows you to record, edit, and publish your own unique podcast by only using your iPhone. It is simple and easy to use, which would make it great for someone who is just getting started with their podcast. Opinion allows a free ten minutes of recording, however, if you would like an unlimited amount, you can pay $3.99.


Step 1: To start recording a podcast on Opinion, all you have to do is press the record button at the top left part of the screen.Sponsor ads:7 Best iPhone Photo Editor Apps To Achieve Filter and Psychedelic Look

Step 2: After you finish recording, you can edit your podcast using the magnifying glass icon. If you would like to cut a section, move the dotted line to where you would like to cut.
Must Read:If you lost data after you updated to a new iPhone, you can always use Gihosoft iPhone Data Recovery to get the data back from the old iPhone or backup.
Gihosoft Free iPhone Data Recovery:iphonerecovery.com
If you use android phones, please choose Gihosoft Android Data Recovery


Step 3: Then, press the trash icon. You can also move around any of the audio clips by holding down the three-lined icon. When you feel like your podcast is complete, press the share icon at the top right to publish your podcasts.
2 How to Make a Podcast on iPhone with Audioboom

Audioboom is a great app for recording podcasts. Always formerly known as audioBoo. It provides users with a platform to create, edit and share their podcasts.


To make a podcast on Audioboom,

Step 1: Navigate to your dashboard.

Step 2: Tap on Upload/Record. This allows you to either select a previously recorded audio file, or start recording a new one.

Step 3: After you've finished recording your podcast, edit it and choose a title for the podcast, add a description and category. If you chose to, you can also add a picture.

Step 4: After you have added the necessary information, click Publish.

Note

The podcast size limit is 200 minutes per podcast session and 200 MB per file.
3 How to Make a Podcast on iPhone with Podbean

Podbean is an easy-to-use podcast app for iPhone. It has a simple user interface and very basic controls.


To make a podcast on iPhone is very easy, just follow these steps.

Step 1: The first thing you have to do is sign up with your email address, you can also do this with a Facebook account.

Step 2: To start recording your podcast, click on the red microphone button at the bottom left corner of the homepage.

Step 3: Click on the red record button again to start recording your podcast. You can play or pause at any time, if you want to. You can also click on the play button to listen to what you recorded so far or you can click on the delete button to move it to trash.

Step 4: If you want to edit or trim your podcast, click on the scissors icon. When you're done editing, click on the save button to export your podcast and share it.

Note

Note that the maximum recording time for podcasts is 90 minutes.
How to Transfer Your Podcasts to Computer

Sometimes, transferring your podcast from your iPhone to computer can get a little tricky. That's where iMyFone TunesMate comes into play. iMyFone TunesMate is an app that allows the creator to transfer their podcasts from any apple device to their computer. This is an extremely useful app that makes transferring any type of media simple.Sponsor ads:Best Free Video Converter for Windows and Mac

Must Read:If you lost data after you updated to a new iPhone, you can always use Gihosoft iPhone Data Recovery to get the data back from the old iPhone or backup.

Gihosoft Free iPhone Data Recovery:iphonerecovery.com

If you use android phones, please choose Gihosoft Android Data Recovery

iPhone 8 is lagging and freezing when calling, How to Fix? 2019

iPhone 8 is lagging and freezing when calling, How to Fix? 2019
Just Force Restart Your iPhone 8

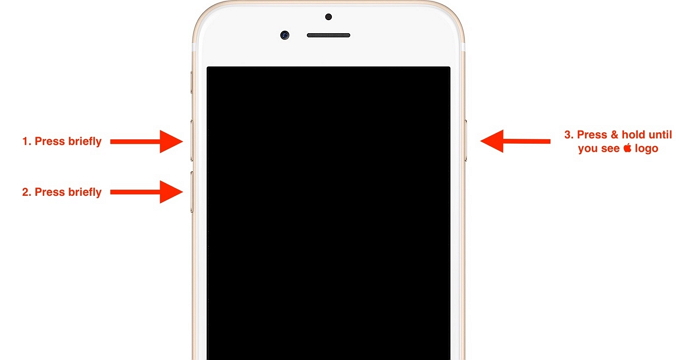
This is the most direct, and generally the most useful method to solve iPhone issue. There are lots of users telling that their iPhone runs normally when they call again after restarting iPhone 8. So just give it a shot:

Just press and quickly release the Volume Up button, then press and quickly release the Volume Down button. Finally, press and hold the Power button until you see the Apple logo.


If There Is a New iOS Version, Just Update to It

If there is a common issues on new iPhone device or iOS, apple may also find this problem soon and solve, at least improve it in a new iOS. So if there is prompt of a new iOS update, just do it:

How to Update on iPhone 8 Itself: Go to Settings > General > Software Update, and then tap Download and Install. Then you can just follow the on-screen instructions to finish the rest steps.


How to Update on iPhone 8 by iTunes: Connect iPhone 8 with iTunes and click Summary > Check for Update. Then Download and Update your iPhone according to the prompts.
Sponsor ads:How to Turn off Tumblr Safe Mode without AccountMust Read:If you lost data after you updated to a new iPhone, you can always use Gihosoft iPhone Data Recovery to get the data back from the old iPhone or backup.
Gihosoft Free iPhone Data Recovery:iphonerecovery.com
If you use android phones, please choose Gihosoft Android Data Recovery


The above two methods are what we have tested useful for iPhone 8 lagging and freezing when calling. We know that there are lots of other method to solve slow iPhone, such as reduce screen motion, close the apps running or stop the auto refresh on background, but I don’t think that’s what users want – when we encounter iPhone issues, we should take action to solve the issue instead of reducing the phone’s function. So there is another useful method you can try to solve iOS issue, including iPhone 8 is lagging and freezing when calling. Read on and check it.Sponsor ads:Fix ios device

Sponsor ads:Android Email Apps
Sponsor ads:The Best Alternative Sites For RARBG 2019 – Still Working Proxy and Mirror Sites

Which PC Case Size is Best for Your Next Build?

  Which PC Case Size is Best for Your Next Build?   There are several common PC case sizes to choose from when building your next gaming PC ...