If you’re wondering how will you jailbreak iOS 11.4.1 and iOS 11.4 if Electra Jailbreak doesn’t support iOS 11.4 and iOS 11.4.1 public releases then the trick is to downgrade to iOS 11.4 beta which Apple is still signing and then using Electra Jailbreak which has been updated to add support for iOS 11.4 beta. But you need to hurry as Apple may stop signing iOS 11.4 beta very soon.
Here are some important points to note before you can follow the instructions to jailbreak your iPhone or iPad:
Make sure that you take a complete backup of your iPhone, iPad or iPod touch using iTunes.
Ensure that your device has enough battery level for the jailbreak process to complete.
Electra Jailbreak for iOS 11.3.1 – iOS 11.2 has just been released. We would recommend waiting for the initial issues to be resolved before trying it. However, if you want to take the risk you can follow the instructions below.
How to Jailbreak Jailbreak iOS 11.4.1, iOS 11.4 Using Electra Jailbreak
Here are the easy steps you can follow to jailbreak iOS 11.3.1 – iOS 11 and install Cydia using Electra jailbreak on your iPhone, iPad or iPod touch:
Step 1: Downgrade iOS 11.4.1, iOS 11.4 to iOS 11.4 beta
Apple is signing iOS 11.4 beta for iPhone X, iPhone 8, iPhone 8 Plus, iPhone 7 and iPhone 7 Plus. You are out of luck if you have any other iOS 11 compatible iOS devices.
You can check our post if you need help on how to downgrade iOS 11.4.1, iOS 11.4 to iOS 11.4 beta.
After you have successfully downgraded to iOS 11.4 beta then proceed to the next steps.
Step 2: Enable Airplane Mode
Coolstar has recommended enabling Airplane mode before using Electra Jailbreak. Access the Control Center, and tap on Airplane toggle to enable it.
Step 3: Disable Siri
Coolstar has also recommended disabling Siri mode before using Electra Jailbreak. Launch the Settings app and navigate to Siri and Search, and tap on Listen for “Hey Siri” and Press Home button for Siri or Press Side Button for Siri toggle and tap Turn Off Siri.
Step 4: Reboot iOS device
After enabling Airplane mode and disabling Siri reboot your iOS device.
After your device has rebooted, ensure that Airplane mode is still enabled, and also ensure Wi-Fi is disabled if it hasn’t got disabled while enabling Airplane mode.
Step 5: Download Electra Jailbreak and Cydia Impactor
coolstar has released two versions of the Electra Jailbreak:
Uses multipath tcp exploit but requires an Apple Developer Account. It is supposed to have a higher success rate.
Uses vfs exploit but doesn’t require an Apple Developer account.
It is recommended to download Electra Jailbreak that uses the multipath tcp exploit (Dev account) from the official website. Please note that you will need an Apple developer account for it.
You need to also download Cydia Impactor from here on your Mac or PC. Cydia Impactor is available for macOS, Windows, Linux (32-bit and 64-bit).
Sponsor Ads:
Gihosoft Free iPhone Data Recovery is a professional iPhone Data Recovery software to get back all your lost text message, photo, video, call history, note, contact and more from iPhone/iPad/iPod Touch.
Gihosoft Android data recovery Free is a super awesome software specialized in Android file recovery. With this program, you are able to recover deleted photos, music, videos, messages, contacts, call logs, WhatsApp messages, Viber chat history and more from Samsung, Huawei, LG, HTC, Motorola, Google, Oneplus, Sony, Lenovo, ZTE and other Android devices directly. Meanwhile, this Android data recovery software is available for both Windows and Mac platforms.
Tuesday, 10 July 2018
Monday, 11 June 2018
How to Fix an iPhone Not Sending Pictures?
Part 1: How to Fix an iPhone Not Sending Pictures?
If your iPhone is behaving and not letting you share your special pictorial memories with your loved one, here are four ways you can fix it. Let’s look at them one by one:
Method 1: Check iMessage
If you’re struggling to send pictures using iMessage because of a frozen “send button” or blue link color, then your problem is likely due to one of the below reasons:
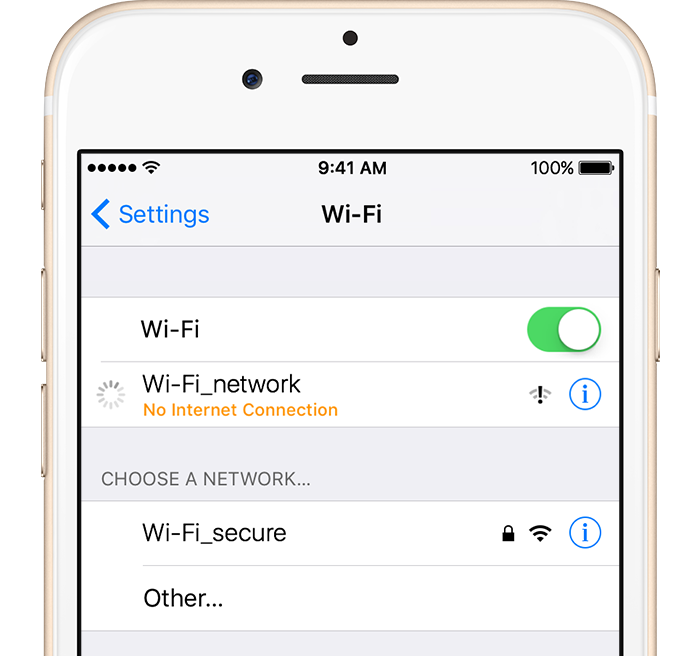
-Network connectivity problem
iMessage works when the internet connection is available to send messages. If your internet connection is unavailable or weak, the messages will not go through.
Solution: Go to Settings>Wi-Fi to, or go to Settings>Cellular turn on your wireless network.
Do you like this story?
Sponsor Ads:
Gihosoft iPhone Data Recovery is a professional iPhone Data Recovery software to get back all your lost text message, photo, video, call history, note, contact and more from iPhone/iPad/iPod Touch. It offers a full solution to recover your lost data in different tough situations. Besides recovering data directly from iPhone, iPad and iPod touch, it also allows you to recover data from iCloud and iTunes backup files.
- Server problem
If the server is down, you will not be able to send pictures using iMessage. This is a popular reason for iPhone not sending pictures.
Solution: Use this link to check the iMessage status. If there’s an iMessage outage, the information will be displayed on the link. If the server is down, you can only wait for it to become functional.
Method 2: Check MMS
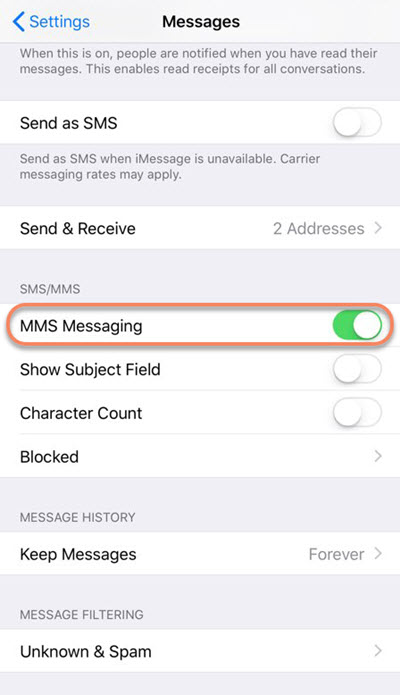
If your iPhone is not sending pictures when you’re using MMS, it’s highly likely that MMS is not switched on in the “Settings” section.
Follow the below steps to turn on MMS settings:
Go to “Settings”, then click on “Messages”.
Find MMS Messaging tab and check if it is turned on or off.
In case the MMS Messaging is switched off, turn it on using the slider.
If MMS Messaging is switched on, then the issue is most likely with your network career. Get in touch with them to resolve the iPhone not sending pictures.
Method 3: Reset your Network
Another prevalent reason is weak cellular network. This will most likely happen if you’re somewhere underground or in a low network signal area.
Try getting access to an area with a strong cellular network and see if you’re able to send the pictures. If your iPhone is still unable to send pictures, the last resort is “Network Reset.”
Follow the steps below to “Reset Network Settings:”
Open “Settings” and click on “General”.
Select the “Reset” option.
Next, click on “Reset Network Settings”.
Confirm if you wish to “Reset Network Settings”.
Try sending the pictures again once your network settings have been reset.

Method 4: Restart your iPhone
The best and the simplest way to check an iPhone not sending pictures is by restarting it. Once you restart your iPhone, try sending the pictures again.
If you are still unable to send pictures, try method 1, 2 or 3.
If your iPhone is behaving and not letting you share your special pictorial memories with your loved one, here are four ways you can fix it. Let’s look at them one by one:
Method 1: Check iMessage
If you’re struggling to send pictures using iMessage because of a frozen “send button” or blue link color, then your problem is likely due to one of the below reasons:
-Network connectivity problem
iMessage works when the internet connection is available to send messages. If your internet connection is unavailable or weak, the messages will not go through.
Solution: Go to Settings>Wi-Fi to, or go to Settings>Cellular turn on your wireless network.
Do you like this story?
Sponsor Ads:
Gihosoft iPhone Data Recovery is a professional iPhone Data Recovery software to get back all your lost text message, photo, video, call history, note, contact and more from iPhone/iPad/iPod Touch. It offers a full solution to recover your lost data in different tough situations. Besides recovering data directly from iPhone, iPad and iPod touch, it also allows you to recover data from iCloud and iTunes backup files.
- Server problem
If the server is down, you will not be able to send pictures using iMessage. This is a popular reason for iPhone not sending pictures.
Solution: Use this link to check the iMessage status. If there’s an iMessage outage, the information will be displayed on the link. If the server is down, you can only wait for it to become functional.
Method 2: Check MMS
If your iPhone is not sending pictures when you’re using MMS, it’s highly likely that MMS is not switched on in the “Settings” section.
Follow the below steps to turn on MMS settings:
Go to “Settings”, then click on “Messages”.
Find MMS Messaging tab and check if it is turned on or off.
In case the MMS Messaging is switched off, turn it on using the slider.
If MMS Messaging is switched on, then the issue is most likely with your network career. Get in touch with them to resolve the iPhone not sending pictures.
Method 3: Reset your Network
Another prevalent reason is weak cellular network. This will most likely happen if you’re somewhere underground or in a low network signal area.
Try getting access to an area with a strong cellular network and see if you’re able to send the pictures. If your iPhone is still unable to send pictures, the last resort is “Network Reset.”
Follow the steps below to “Reset Network Settings:”
Open “Settings” and click on “General”.
Select the “Reset” option.
Next, click on “Reset Network Settings”.
Confirm if you wish to “Reset Network Settings”.
Try sending the pictures again once your network settings have been reset.
Method 4: Restart your iPhone
The best and the simplest way to check an iPhone not sending pictures is by restarting it. Once you restart your iPhone, try sending the pictures again.
If you are still unable to send pictures, try method 1, 2 or 3.
Friday, 8 June 2018
How to Take Screenshots in macOS Mojave ?
macOS Mojave has a smart screen capture tool. You have several convenient options, such as setting a timer and even preselecting the location of the recording. Clearly, taking screenshots in MacOS Mojave is a better experience.
The new tool works perfectly to allow you to turn on the screen. Whether you want to capture the entire screen or capture only a selected portion of the screen on your Mac, the new macOS allows you to work more efficiently.
How to capture a screenshot on Mac Running MacOS Mojave
How to capture screenshots on MacOS Mojave remains the same as before. For example, To capture in full screen use the combination of Command + Shift + 3.
]
And take a screenshot of the particular portion, use Command + Shift + 4 On the keyboard.
However, if you want to use a smart screen capture tool, follow the steps below .
Step # 1. First, press Command + Shift + 5 on the keyboard to quickly access the toolbar
Step # 2 Now you have three options:
Screenshot of the whole screen
Capture selected windows
Capture selected portion
Choose one of the options according to your needs and capture screen will be captured at the moment you have selected windows or part.
What about setting a timer before capturing the screen? Keep Reading …
Gihosoft iPhone Data Recovery is a professional iPhone Data Recovery software to get back all your lost text message, photo, video, call history, note, contact and more from iPhone/iPad/iPod Touch. It offers a full solution to recover your lost data in different tough situations. Besides recovering data directly from iPhone, iPad and iPod touch, it also allows you to recover data from iCloud and iTunes backup files. What's more, it supports Smart Recovery modes that can find your iPhone data quickly.
https://www.gihosoft.com/iphone-data-recovery-free.html
How to Use Screen Time in iOS 12 on iPhone and iPad
To me, the biggest highlight of iOS 12 is the more superior “Parental Controls.” The addition of “Screen Time” has made controlling the device and app usage more convenient. From letting you keep track of how much time you spend on your iPhone to restrict explicit contents, you can use Screen Time in iOS 12 to have immaculate command over the way your kid uses the device.
Don’t want your kid to use social networking apps too much? Well, you can impose the limitation on social apps and even put the same restriction on games categories. Besides, you also have the option to set a daily time limit for an app so that your child doesn’t overuse it. Beyond enhanced parental control, Screen Time can also play a pivotal role in keeping your smartphone addiction in check! More after the break:
How to Use Screen Time in iOS 12 on iPhone or iPad
Screen Time sends your weekly report about the usage of your device as well as the set time limits regarding the apps you would like to have better control. If you have set it up as a parent, you will get reports for your child’s screen time. And then based on the insightful report, you will be able to apply restrictions for apps, content, and privacy accordingly.
How to Turn on Screen Time
By default, Screen Time is enabled, but if you had turned it off earlier, you could always get started with it.
Step #1. Launch Settings app → select the Screen Time option.
Sponsored Links
Step #2. Now, hit Turn On Screen Time.
Step #3. Next, you have two options:
Sponsored Links
- Set this feature as a parent
- Continue as a general user
Tap on Continue.
Use Screen Time Passcode
You can set Screen Time Passcode to prevent others from making any changes to the Screen Time settings. To do so,
Step #1. Tap on Use Screen Time Passcode.
Step #2. Enter new Passcode and Confirm.
How to Enable Downtime in iOS 12
Downtime is a very impressive feature that lets you set a schedule for time away from the screen. Once enabled, only the apps you choose and phone calls will be available to be used.
An important thing you need to know that Downtime will automatically come into action on all of your iOS 12 devices synced with the same iCloud account.
Step #1. Launch Settings app on your iOS device → Tap on the Screen Time.
Step #2. Now, tap on Downtime → Enter the Screen Time Passcode.
Step #3. Turn On the Switch next to Downtime.
Step #4. Next, Tap on Start and set the time then tap on End and set the preferred time.
While Downtime is ON, your device Home screen will get a bit dim, and the approved apps will be highlighted.
If you tap an app to open it, “Time Limit Reached” screen will appear.
You have the option to ignore the restriction by tapping Ignore Limit. Then, you will have to set a reminder in 15 minutes or set to ignore the limit for the day. Enter your Screen Time Passcode.
As soon as Downtime is finished, the screen will come back to its normal look and brighten up again. Besides, you will be able to re-access your apps.
Now, you can choose the apps you want to allow during Downtime. To do so, go back and select Always Allowed → Enter Passcode.
Then, tap on the green “+” button to the left of the app you want to allow.
If you want to disallow some apps during Downtime, tap on the red “-” button to the left of any app and then tap on Delete.
How to Set App limits in iOS 12
Don’t want your kid to overuse an app or play games too much? You can set a time limit for app categories to allow your child to use a particular category of apps only during the limited time.
Important: Another thing worth noting is that App Limits will affect all the iOS 12 devices connected to the same iCloud account.
Step #1. Open Settings app on your iOS device → Now, tap on the Screen Time.
Step #2. Next, tap on App Limits and then enter your passcode.
Step #3. Next up, tap on Add Limit.
Step #4. Up next, select the app categories. You have multiple options to choose from like games, social networking, education, Health & Fitness → Once you have selected the app categories, tap on Add at the top.
Step #5. Now, set the time limit.
Check out the option to Customize Days as well. You can choose to keep the app restriction every day or allow your kid to use apps with complete freedom on a few days. Again, you get the option to set the time limit.
Do note that App limits reset every day at midnight. You will receive notification when you near your daily limit to keep you in the loop. After the time limit is over, you will get “Time Limit Reached” screen. Then, you have the option to ignore the restriction by tapping Ignore Limit.
You will also have the option to set a reminder in 15 minutes set to ignore the limit for the day.
How to Enable Content & Privacy Restriction in iOS 12
You can ideally customize content and privacy restriction to block inappropriate content.
Step #1. Launch Settings app on your iOS device → Tap on Screen Time.
Step #2. Tap on Content & Privacy Resrtictions. Next, enter your Screen Time Passcode.
Step #3. Turn On the switch next to Content & Privacy.
Next up, you can make necessary changes based on your requirements. For instance, you will be able to restrict iTunes and App Store purchases, disallow particular content, apps, explicit language.
Besides, you also have the option to prevent your kid from making any changes to volume limit, Do not disturb while driving feature, etc.
There is also an option to set up Screen Time for Family. When it’s enabled, you will get weekly reports and set time limits on your child’s device.
How to Set Up Screen Time for Family
Note: Make sure to enable family sharing to use this feature.
Step #1. Open Settings app on your iOS device → Tap on Screen Time.
Step #2. Now, scroll down and tap on Family Member’s name. Now you can Set up Screen Time for the Family member.
How to Disable Screen Time Passcode
Every time you want to make changes to Screen Time options, you are asked to enter the passcode. However, if you don’t want to have it, you can disable it.
Step #1. Open Settings app → Tap on Screen Time.
Step #2. Now, tap on Disable Screen Time Passcode. Enter Screen Time passcode.
How to Clear Screen Time Usage Data
At times, you may want to wipe out all the existing Screen Time usage data to start afresh.
Step #1. Open Settings app → Tap on Screen Time.
Step #2. Now, scroll down and tap on Clear Usage Data, enter your Screen Time Passcode and confirm.
How to Turn Off/ON Screen Time in iOS 12
If you ever decide to disable Screen Time, you have the option to turn it off with ease.
Step #1. Launch Settings app → Tap on the Screen Time.
Step #2. Now, tap on Turn ff Screen Time and enter your passcode → Next, tap on Turn Off Screen Time to confirm.
If you changed your mind later, return to the Screen Time section and tap on “Turn On Screen Time.” Then, you can choose to set it up as Parent.
Video Walkthrough of Screen Time
That’s it!
Have your say
Now, it’s time to make the most of this enormously user-friendly feature to have greater control over device usage and prevent your kid from breaking the set boundaries. Have any feedback? Shoot it in the comments below.
Gihosoft iPhone Data Recovery is a professional iPhone Data Recovery software to get back all your lost text message, photo, video, call history, note, contact and more from iPhone/iPad/iPod Touch. It offers a full solution to recover your lost data in different tough situations. Besides recovering data directly from iPhone, iPad and iPod touch, it also allows you to recover data from iCloud and iTunes backup files. What's more, it supports Smart Recovery modes that can find your iPhone data quickly.
Friday, 11 August 2017
Apple will soon produce its own OLED technology to cut supplies from Samsung
Apple has reportedly purchased giant equipment to setup its own research and development center in Taiwan to produce OLED technology on its own to reduce reliance on Samsung.
Must Read:how to fix iPhone 1970
The report from Taiwanese Trade Publication Digitimes states that Apple has already purchased CVD Machines (Chemical Vapor Deposition) to produce 2.5G OLED panel from Korea. The CVD Machines are used for OLED Panel creation.Must Read:videos cache

It might take some time for Apple to get around with the research and development
of new OLED technology. But by the time it launches iPhone 9, it will improve and will produce large unit of OLED Panel on its own. Currently Apple has contracted to Samsung which will be producing about 160 million OLED iPhone Panels for couple of years.

iOS 12 will introduce 70 new emoji characters for iPhone, iPad, and iPod
70 NEW EMOJI CHARACTERS COMING SOON TO IOS
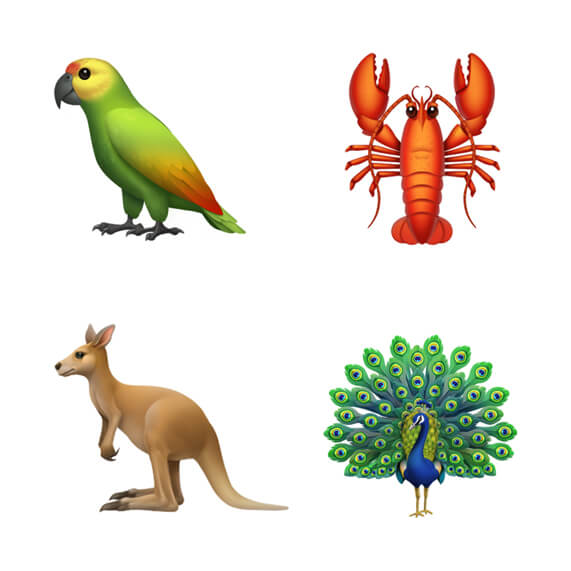
New emoji characters include a cold face, party face, pleading face, and a heart face. The new character set will also feature exotic animals (kangaroos, lobsters, parrots) and food items (mooncake, mango, lettuce, cupcake, etc).
It will also allow users to create new emojis and personalize them with different hairstyles and skin colors.
Apple will create these new characters with the all-new Unicode 11.0 character set.
Although Memojis are better than these stock emojis, a lot of users still use older devices and rely on stock characters.
Here’s hoping Apple will also add a search feature or better segmentation considering the number of emojis that are already present in iOS.
WHEN WILL APPLE RELEASE THE NEW EMOJIS?
Apple has yet to state an official release date. According to the Newsroom article, the new characters will arrive on iPhone, iPad, and iPod touch this fall, probably with iOS 12.
Apple Watch and macOS, too, will receive the new emojis with the upcoming public builds of macOS 10.14 and watchOS 5.
Although the beta versions of iOS 12 and macOS Mojave are already available for testers, the Unicode 11.0 character set is not yet available for use.
The reason being is that this standard was approved on June 5. Major smartphone manufacturers such as Apple and Google will incorporate Unicode 11.0 only in the upcoming software updates.
Jihosoft iPhone Backup Extractor Extract and recover all types of data from iPhone backup files, such as camera roll photos, videos, SMS, contacts, reminders, WhatsApp, and etc.
Gihosoft Free iPhone Data Recovery is a professional iPhone Data Recovery software to get back all your lost text message, photo, video, call history, note, contact and more from iPhone/iPad/iPod Touch.
This year, Apple has planned to launch new OLED iPhone 8 along with iPhone 7s and
iPhone 7s Plus. Stick with us more news and rumors.
iPhone 7s Plus. Stick with us more news and rumors.
Download iCleaner ipa without Jailbreak in iOS 11/10/9 on iPhone – iPad
iCleaner is one of the most popular Jailbreak app that helps to delete cache and junk files from iOS devices. To install iCleaner, your iPhone – iPad needs to be Jailbroken but what if you do not have Jailbreak on your iPhone or iPad? The good thing is you can still install iCleaner ipa even if your device is not Jailbroken.Must Read:erase all content and settings
To download and install iCleaner ipa on iPhone – iPad without Jailbreak in iOS 11 -10 -9 first of all you need to install AppValley, an app that offers number of different hacked apps, cracked apps, tweaked apps and more. Before you can download iCleaner ipa, download AppValley by following this link below:Must Read:imyfone umate pro
How to Install App Valley on iPhone – iPad Must Read:clear search instagram
Gihosoft Free iPhone Data Recovery is a professional iPhone Data Recovery software to get back all your lost text message, photo, video, call history, note, contact and more from iPhone/iPad/iPod Touch.

Tuesday, 8 August 2017
Use PayPal For App Store and iTunes
PayPal is one off the most popular payments for goods and services. According to an announcement, Apple confirmed that Paypal has now been included as a secure payment option for the App Store, iTunes Store, Apple Music and even iBooks store. That means you can now use PayPal to pay for your digital purchases at iTunes
Many users having PayPal accounts will get the benefit from this. Specifically, they can conveniently link their PayPal account to Apple ID, and take advantage of the services to make payments for dowloading music, movie, apps and more. Furthermore, the services of PayPal can also be used to upgrade membership for a premium iCloud Storage plan.Must Read:How to get more storage on iPhone?
So if you are having an Papal account ad want to use it for Apple’s services, here is step-by-step guide to use PayPal as an payment method for your iTunes and App Store purchases.
Must Read:How to get more storage on iPhone?
Steps to Use Paypal for App Store and iTunes Purchases
- First, tap to sign to your iTunes account by using your Touch ID or Apple ID.
- Next, move to Payment section and then tap on PayPal.
- Once you are in the PayPal app, tap on Account.
- Now follow the authentication process to confirm your PayPal account. After you have successfully authenticated your PayPal account, all purchases from App Store, iTunes Store, Apple Music in the future will be paid by your PayPal account.
PayPal also offers advanced features to help your experience be more intuitive. After you have linked the PayPal membership account to Apple ID, it will let you access to the unique One Touch feature, which you can make your purchases secure and quick for all the products such as iPad, iPhone or Apple WWatch.
The PayPal support in App Stores will first be released in Canada, Mexico, Netherlands, Germany, and the United Kingdom. After these countries, PayPal will launch its support to the rest part of the world in the coming weeks.
iOS 12 will introduce 70 new emoji characters for iPhone, iPad, and iPod
70 NEW EMOJI CHARACTERS COMING SOON TO IOS
New emoji characters include a cold face, party face, pleading face, and a heart face. The new character set will also feature exotic animals (kangaroos, lobsters, parrots) and food items (mooncake, mango, lettuce, cupcake, etc).
It will also allow users to create new emojis and personalize them with different hairstyles and skin colors.
Apple will create these new characters with the all-new Unicode 11.0 character set.
Although Memojis are better than these stock emojis, a lot of users still use older devices and rely on stock characters.
Here’s hoping Apple will also add a search feature or better segmentation considering the number of emojis that are already present in iOS.
WHEN WILL APPLE RELEASE THE NEW EMOJIS?
Apple has yet to state an official release date. According to the Newsroom article, the new characters will arrive on iPhone, iPad, and iPod touch this fall, probably with iOS 12.
Apple Watch and macOS, too, will receive the new emojis with the upcoming public builds of macOS 10.14 and watchOS 5.
Although the beta versions of iOS 12 and macOS Mojave are already available for testers, the Unicode 11.0 character set is not yet available for use.
The reason being is that this standard was approved on June 5. Major smartphone manufacturers such as Apple and Google will incorporate Unicode 11.0 only in the upcoming software updates.
Jihosoft iPhone Backup Extractor Extract and recover all types of data from iPhone backup files, such as camera roll photos, videos, SMS, contacts, reminders, WhatsApp, and etc.
Gihosoft Free iPhone Data Recovery is a professional iPhone Data Recovery software to get back all your lost text message, photo, video, call history, note, contact and more from iPhone/iPad/iPod Touch.
Subscribe to:
Posts (Atom)
-
A number of Apple services are currently experiencing an outage. This includes Apple Music, iCloud, App Store, the developer portal, and mor...
-
A BuzzFeed report details that Apple had given strict instructions to creators of its various Apple TV+ shows to not show China in bad light...
-
Question Hello! I'm wondering what is the spinning circle/rotating circle on my iPhone showing just next to the Wi-Fi icon. It is kind o...


